

Help with purchase history and connecting email
How to connect a mailbox, search saved purchases, and which details are taken from order emails.
Using My purchases
Under “My purchases” you search, review and edit recognised purchases. Set the import filter under “Email accounts – connect and manage”.
Purchase history from order emails
Evylla reads order and receipt emails in a connected mailbox. For a recognized purchase it stores shop, order number, date, items, and amounts. Not every email becomes a purchase.
Under “My purchases” you search these details by product, shop, or order number. Your plan limits which time range you can view and search.
After a paid plan ends you stay on Core. Purchases remain stored; viewing and search go back to the last 3 days. A later upgrade opens your plan’s time range again.
Accept, reject and edit orders
Under “My purchases” you find search at the top and the list of recognised purchases below. Use the action bar to decide which entries stay and which to adjust. There is no separate “Search” menu item anymore.
-
Select entries
Open “My purchases”. Tick individual orders or choose “All”. The action bar above applies to your current selection.
-
Accept
“Accept” marks orders as accepted. They count as confirmed and appear in search and the list under “My purchases”.
-
Reject
“Reject” marks entries as not relevant (e.g. ads or false matches). Rejected orders no longer appear in search under “My purchases”.
-
Edit
“Edit” opens a dialog to set status and/or merchant for all selected entries at once. Empty fields stay unchanged.
Understand and set the import filter
When connecting and syncing, the import filter decides which emails count as purchases. Level 3 (Balanced) is now the default. Missing something? Loosen step by step — level 5 (Maximum) loads almost all order and purchase emails.
-
What the filter does
Evylla checks each email during sync (confirmation, order number, amount, items, etc.). Stricter levels only let clear purchase emails through; looser levels catch more — including status and shipping mail with purchase context.
-
The five levels at a glance
Level 3 is preselected and recommended. Level 5 (Maximum) is for when you want to miss as few order/purchase emails as possible:
- Very strict
- Only clear purchase confirmations. Shipping, tracking, status and marketing are aggressively ignored. Order numbers and very similar purchases are not created twice.
- Strong
- Only very clear purchase signals; shipping and marketing are rejected. Status updates are not new purchases. Duplicate order numbers and very similar purchases are merged.
- Balanced (recommended)
- Default and recommended. A good balance of recognised purchases and few false matches. Marketing is filtered; shipping only without strong purchase signals.
- Light
- More emails count as purchases. Borderline invoices with an amount are more often accepted. Marketing still filtered.
- Most open (let almost everything through)
- Loads almost all emails related to orders or purchases (confirmation, invoice, receipt, status/shipping with purchase signals). Only pure returns/refunds and strongly promotional mail without purchase context are filtered out.
Tip: New accounts start at level 3. Existing accounts keep their current level until you change and save it under “Email accounts – connect and manage”.
-
Open the filter or choose it when connecting
Under “Email accounts – connect and manage” you will find the import filter (or “Change filter”). When first connecting an account, level 3 is already selected — you can change it right away.
-
Purchase missing? Loosen the level
If an order, invoice or receipt email is missing: move one level up (e.g. 3 → 4 → 5). Level 5 loads almost everything with order/purchase context. You can reject unwanted hits later under “My purchases”.
-
Save — then re-evaluate
After saving, Evylla syncs again and re-checks previously skipped emails with the new filter. Orders already created stay unchanged.
-
Check the result
Under “My purchases” you will see new entries. Accept good ones, reject mismatches. Still missing something? Loosen one more level (up to Maximum) and save again.
Billing
Upgrade and cancellation are under “Billing” in the menu (same page title).
Upgrade a plan or pass
You always start an upgrade on the Billing page. Choose a plan there and pay via Stripe.
-
Open Billing
Sign in and open “Billing” in the menu — or the “Billing” tile on the dashboard.
-
Choose a plan or pass
Compare plans (pass = one-time payment, month/year = subscription). Your current plan is marked “Current”.
-
Choose plan / Buy pass
For subscriptions click “Choose plan”, for passes “Buy pass”. You are redirected to Stripe Checkout.
-
Pay and return
Complete payment. You return to Billing; your access is updated.
If you already have an active subscription (month/year), other subscriptions show “Switch in portal”. The change then goes through the Stripe customer portal — not a new checkout.
Cancel a subscription
Recurring subscriptions (month/year) are cancelled in the Stripe customer portal. You open it from Billing.
-
Open Billing
Menu → “Billing”.
-
Open the customer portal
Scroll to the “Customer portal” section. Click “Open portal” or “Cancel subscription”. The Stripe portal opens in a new tab.
-
Cancel in the portal
In the customer portal you can cancel the subscription, change payment method and view invoices. Cancellation takes effect at the end of the current billing period; access stays active until then.
A pass (one-time payment, e.g. 3 or 7 days) does not renew — it ends automatically. No cancellation needed. The customer portal appears only after you have paid at least once via Stripe.
Connect an email account
Link your inbox to Evylla so order and receipt emails can be recognised. Choose your provider and follow the guide.
Connect Gmail to Evylla
Connect a Microsoft account
How to connect Outlook or a Microsoft account to Evylla so order and receipt emails can be recognized — without an app password.
-
Open Email accounts
Sign in to Evylla and open “Email accounts – connect and manage” (menu or the “Email accounts” tile).
-
Choose Outlook / Hotmail / Microsoft 365
Under “Outlook / Hotmail / Microsoft 365” you will find the connect option. You do not need other providers for this.
-
Start connecting
Optionally enter your email address and choose the import filter (default: level 3 Balanced). Then click “Connect with Microsoft”.
-
Sign in with Microsoft
You are taken to the Microsoft sign-in page. Sign in with the account whose inbox Evylla should read (e.g. Outlook.com or your work account).
-
Trust the app
Microsoft asks whether you trust this app and allow access. That is normal: Evylla can then read order emails — your password is not shared with Evylla.
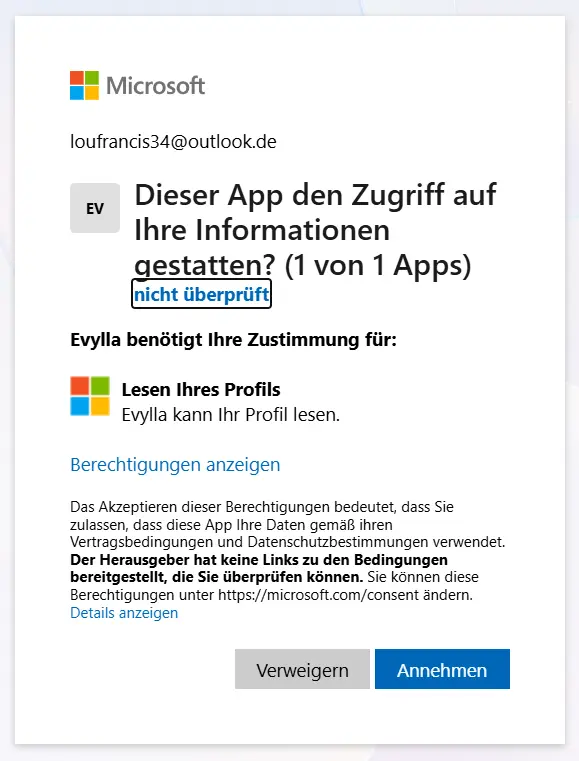
Example: Microsoft asks whether you want to trust the app. Tap “Accept”, “Consent”, or “Yes, trust” (the exact wording may vary by language and account). If you decline, the connection is not created.
-
Back in Evylla
After you approve, you return to Evylla automatically. Your Microsoft account is then connected.
-
Sync
Evylla then fetches matching order and receipt emails. This can take a moment. Recognised purchases then appear under “My purchases”.
Connect Yahoo account
Primary path: app password after 2FA. Optional: free Outlook.com just for Evylla with forwarding – no existing Gmail or Outlook required.
Connect iCloud / Apple
For iCloud you need an app-specific password from Apple and connect via mailbox access (IMAP). There is no Microsoft-style sign-in for personal iCloud accounts.
-
Check 2FA
Under “Sign-In and Security”, two-factor authentication must be on – otherwise app-specific passwords will not appear.
-
Create app password
Open “App-Specific Passwords”, name it “Evylla”, and copy the password.
-
Enter in Evylla
Under “Email accounts – connect and manage” choose provider iCloud, then enter your iCloud email and app-specific password.
-
Test and save
Tap “Test connection” and save. Server: imap.mail.me.com, port 993, SSL.
-
Fetch order emails
Evylla then fetches matching order and receipt emails from the iCloud mailbox.
Without two-factor authentication, Apple does not show app passwords.
Connect GMX
Connect GMX to Evylla: first enable IMAP, then create an app password for “Evylla” under Account → Login & Security and enter it in Evylla with your GMX email.
-
Enable IMAP
Under Settings → Email programs or POP3/IMAP, allow IMAP access and save.
-
Create an app password
Initials → Manage account → Login & Security → Manage app passwords → New app password → name “Evylla” → copy once. With 2-step, do not use your normal GMX password.
-
Enter in Evylla
Under “Email accounts – connect and manage” choose GMX, then enter your full GMX email address and the app password.
-
Test and save
“Test connection” and save. Server: imap.gmx.net, port 993, SSL.
-
Fetch order emails
Evylla then fetches matching order and receipt emails from your GMX mailbox.
Without IMAP, sign-in fails. With 2-step you need an app password – not your normal GMX password.


